I’m super excited to announce that we just launched a brand new feature called Personalization.
With Personalization you can carry a response from any step in a LeadForm to another step, creating a more personalized experience right in your LeadForms.
We made in insanely easy, and you don’t to need hire a techie to do it for you.
Why is personalization important?
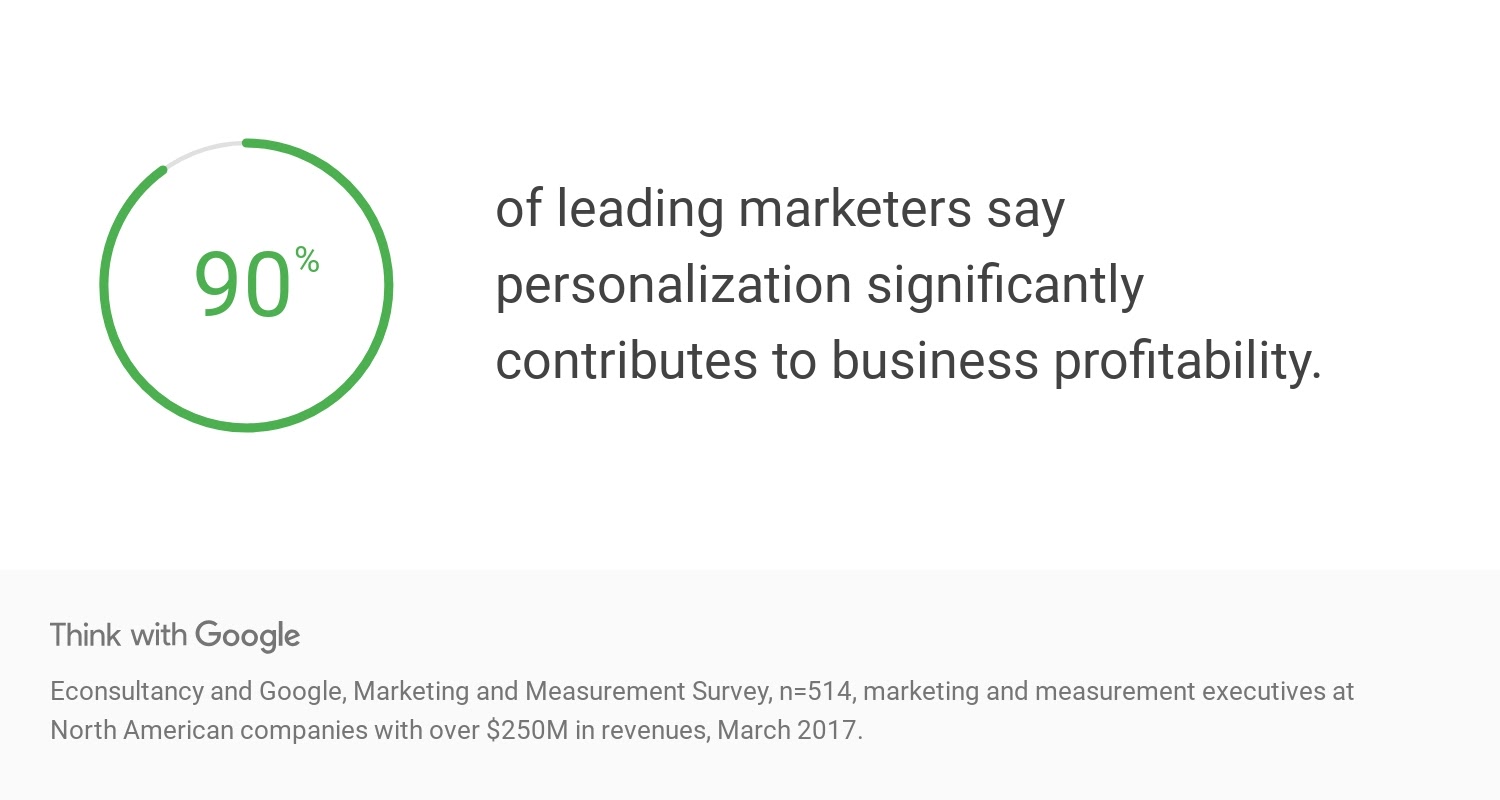
According to a survey from Google, 90% of leading marketers say personalization significantly contributes to business profitability.
And according to research from Invesp, personalized ads convert 10 times higher than generic ads.
In fact, a whopping 74% of consumers say that they get frustrated by seeing content that doesn’t match their needs and interests.
When it comes to personalization in marketing, we personalize our email marketing, direct mail, landing pages, and even our ads.
But why not our lead forms?
Well, all of that changes today.
Knowing just how important personalization is, we set out to finally make it possible to personalize our LeadForms, like never before.
In fact, to get this level of personalization into your forms it would take you hours of coding. But now, you can easily add personalization into you forms in seconds (no coding required).
Let’s dive in!
How The Personalization Feature Works
Let’s take a look at three examples of Personalization in-action:
Example 1: Personalizing With Just Name
Let’s say that your LeadForm asks the prospect for their first name. To make your form more personalized you can simply add the variable {name_first_name} to your message.

After someone inputs their name (Let’s say “Mike”) your form will look something like this:

Notice how the contact message is now customized with the prospect’s First Name.
Just like that, you’ve made your form more personalized. You can see an exact example of a form using personalization here.
Combine personalization with our “Chat Style” LeadForm, and you’ll have one super high converting lead form.
Example 2: Personalizing All Parts of Your LeadForm (Even the Submit Button)
In this example we’re going to go one step further.
We’re not only going to personalize the form with the lead’s name, but we’re also going to carry the response through to multiple steps in the form, including the submit button.
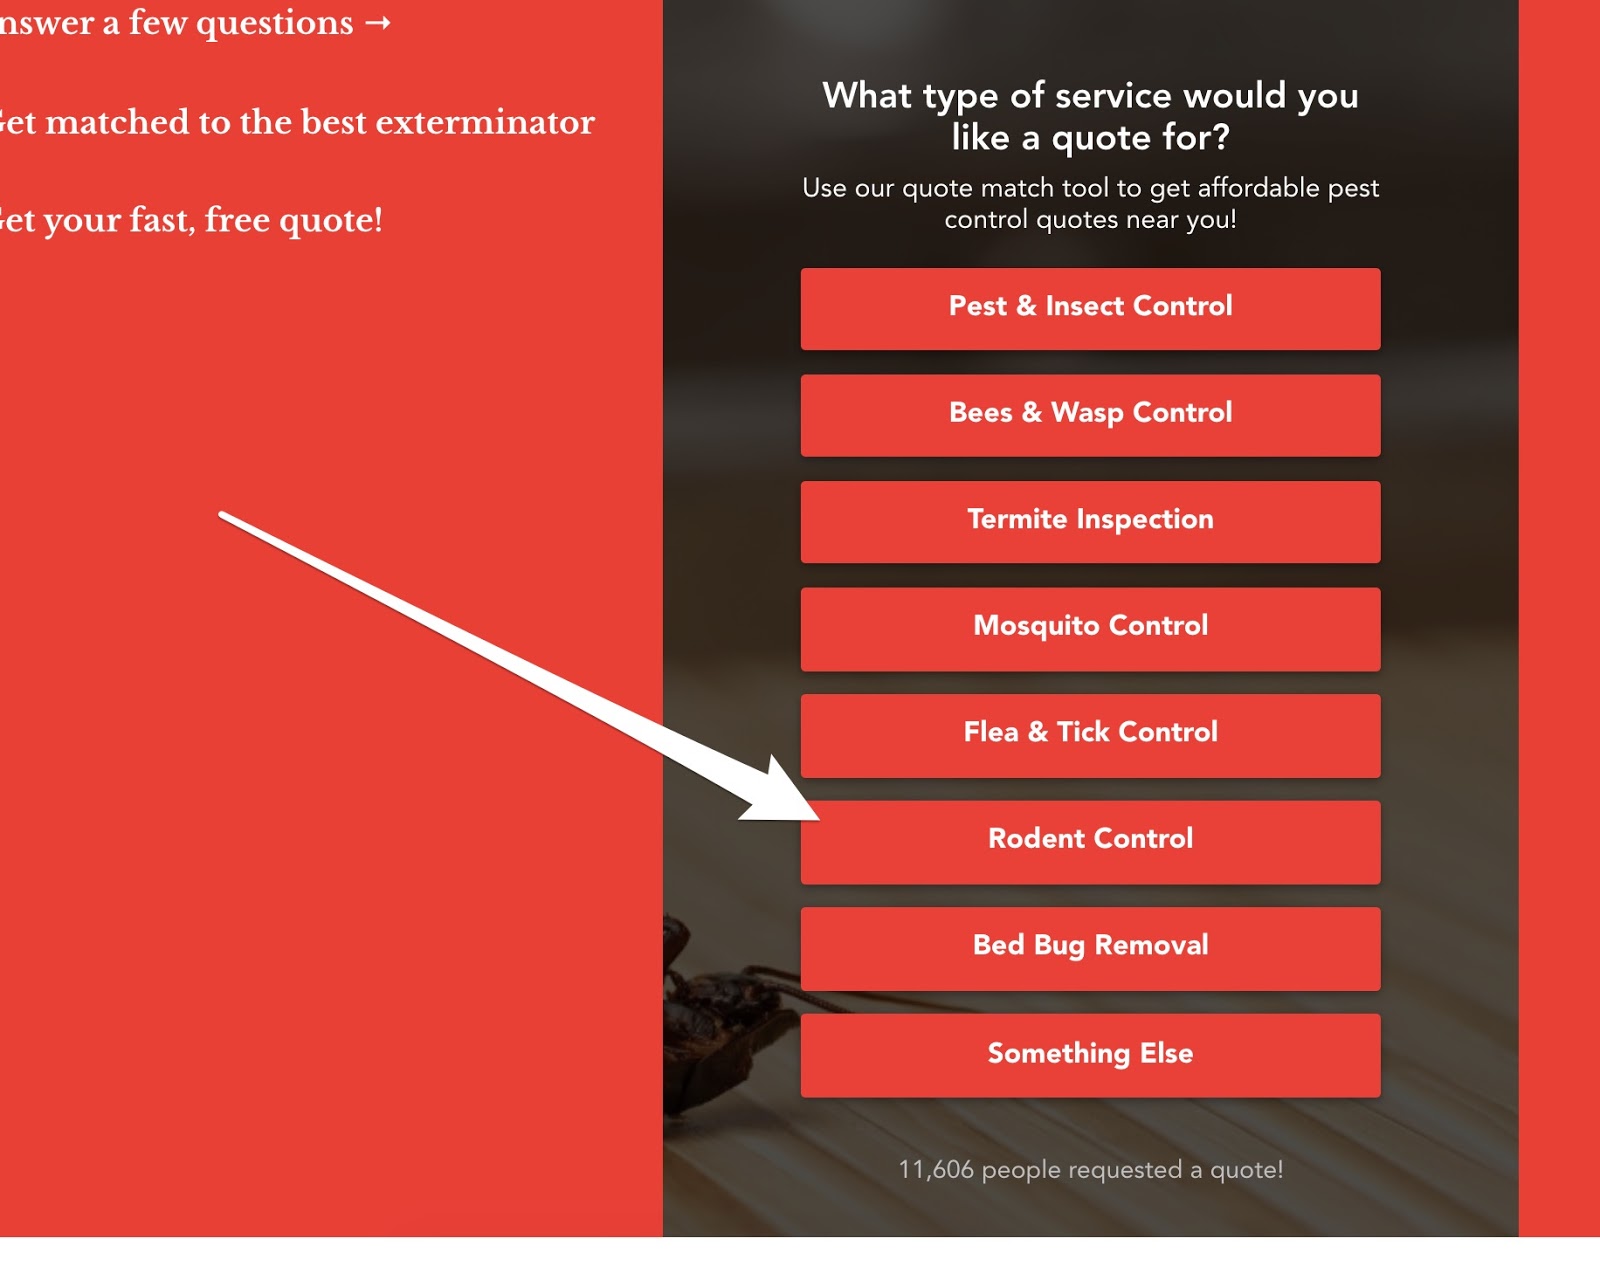
In this example, imagine that a restaurant owner is having a rodent issue in their kitchen. They visit your site for a quote and choose the option “Rodent Control” in the LeadForm below.
 After choosing “Rodent Control” on Step 1, your lead sees a highly personalized second step that uses the lead’s previous choice “Rodent Control” in the step description area which reads: “Is this Rodent Control service for your home or business.”
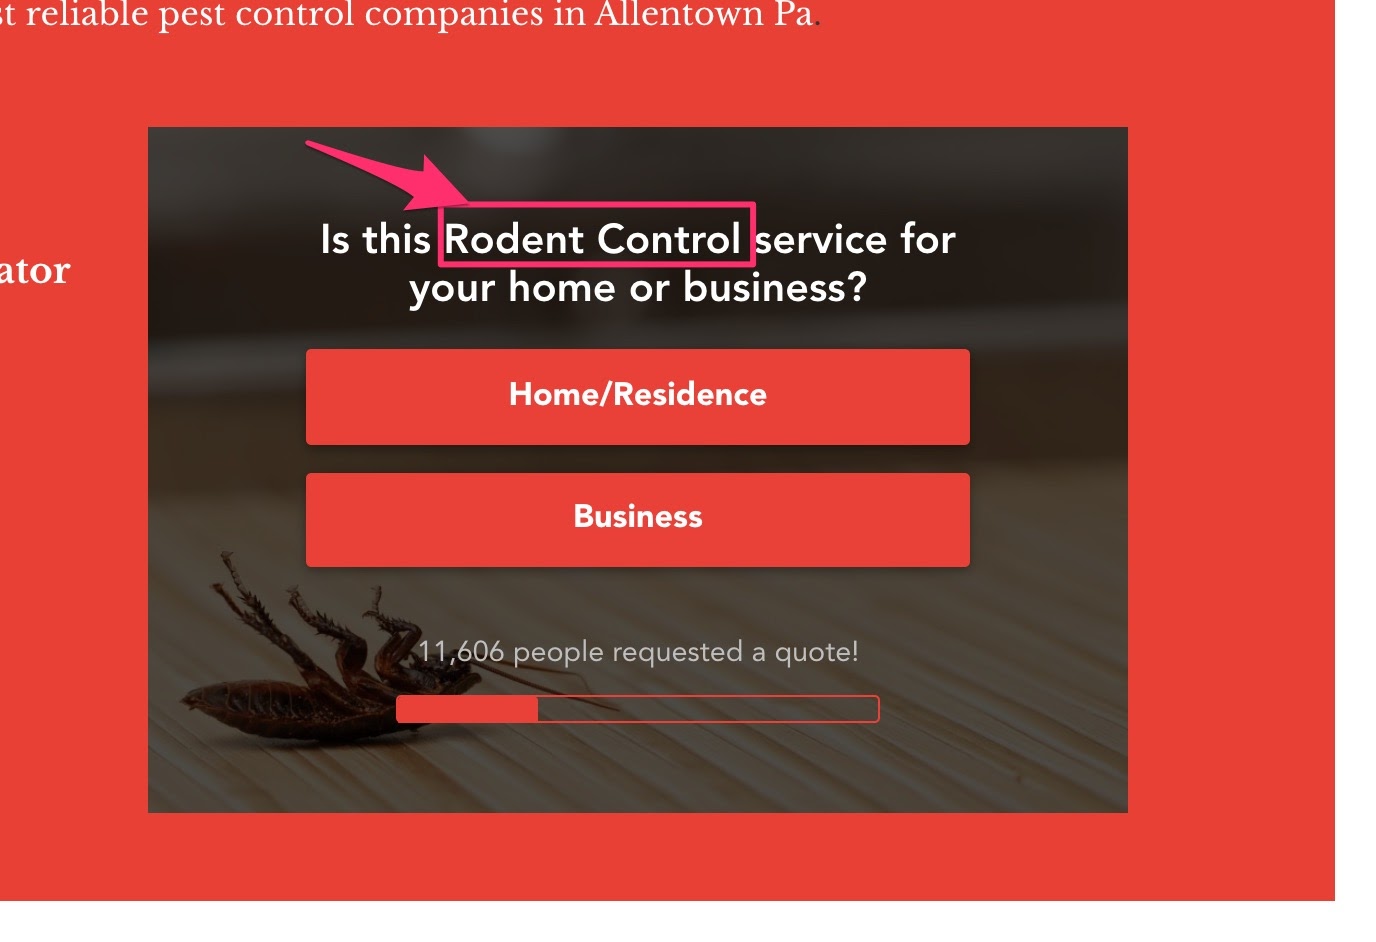
If the prospect had selected a different response like “Flea & Tick Control” then the step would have used “Flea & Tick Control” instead of “Rodent Control”.
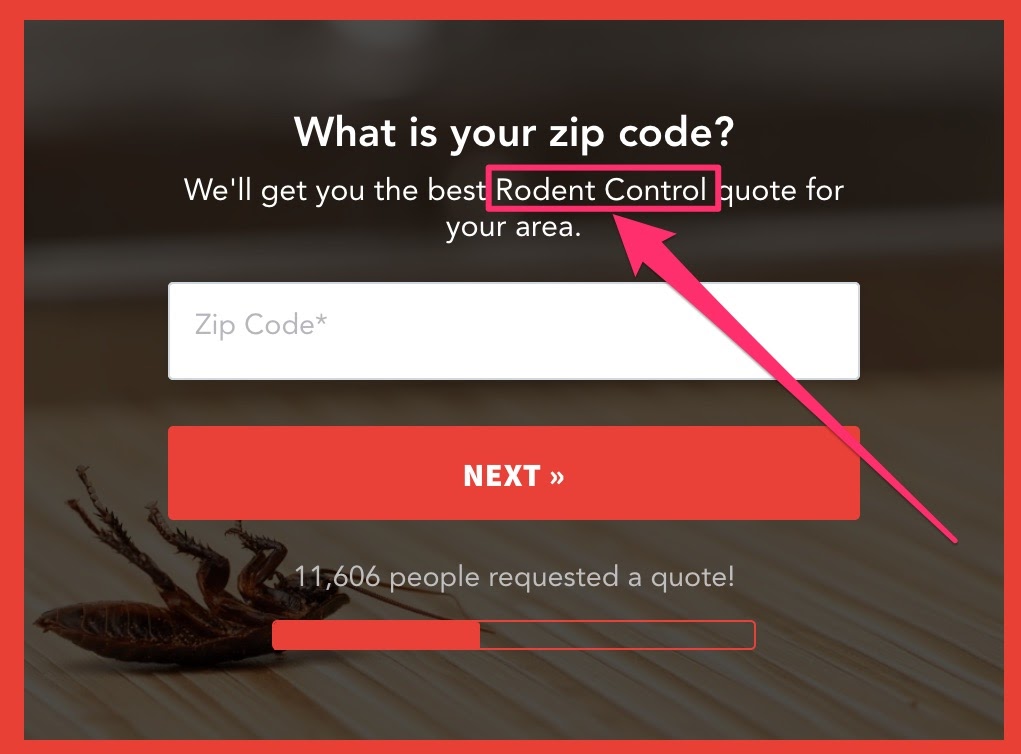
On Step 3, we carried the response “Rodent Control” into the sub-headline, just to remind the prospect that we know that they’re looking for “Rodent Control” help.
Next, after the prospect enters their Zip Code we ask them to briefly describe their issue.
The description field is another great place to add some additional personalization, especially since you’re asking the prospect to give you more information.
To help keep the prospect engaged and to remind them that they selected “Rodent Control” on step #1, we used their response in the description text so it reads, “Please describe your Rodent Control Issue”

Finally, after the prospect enters their name, they are taken to the final step of the form, which looks like this:
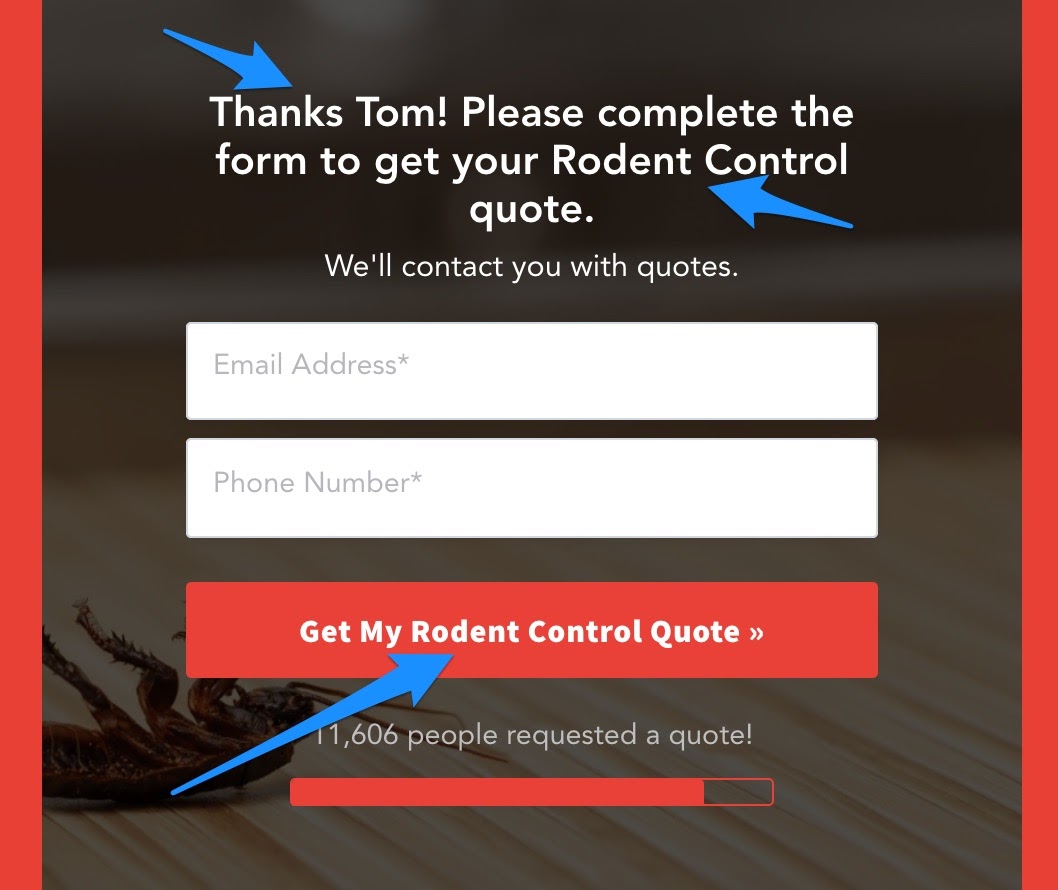
This step is a really great example of personalization in-action.
Rather than showing just a generic message, we’re personalizing multiple parts of the contact form to boost conversions.
First, we added the lead’s name right into the description to build some rapport and engage the lead.
Second, in addition to highlighting the Name, we also carried “Rodent Control” through to personalize the contact message to the lead’s issue.
Finally, we took things one step further and even added their issue to the submit button.
So rather than saying something generic like “Get My Quote” the button says “Get My Rodent Control Quote.”
In other words, the button is dynamically personalized to match what the prospect is looking to get a quote for. Simply personalizing the button alone will most likely drive conversions through the roof!
You can see an example of this form in-action here.
Example 3: Personalizing With UTM Parameters (Great for Google Ads)
This is really cool (and useful) if you drive traffic via PPC channels like Google Ads, Bing Ads, and even Facebook Ads.
In addition to personalizing your LeadForms with in-form responses, you can also personalize the forms for your ads.
A great way to boost conversions from PPC traffic.
Some examples include:
- Dynamically matching the headline of your form to the headline of your ad
- Personalizing the form with keywords and locations
- Personalizing the on-site messages with the headline of the ad or the location
Let’s take a look at some of the examples below:
1) Dynamically matching the headline of your form to the headline of your ad:
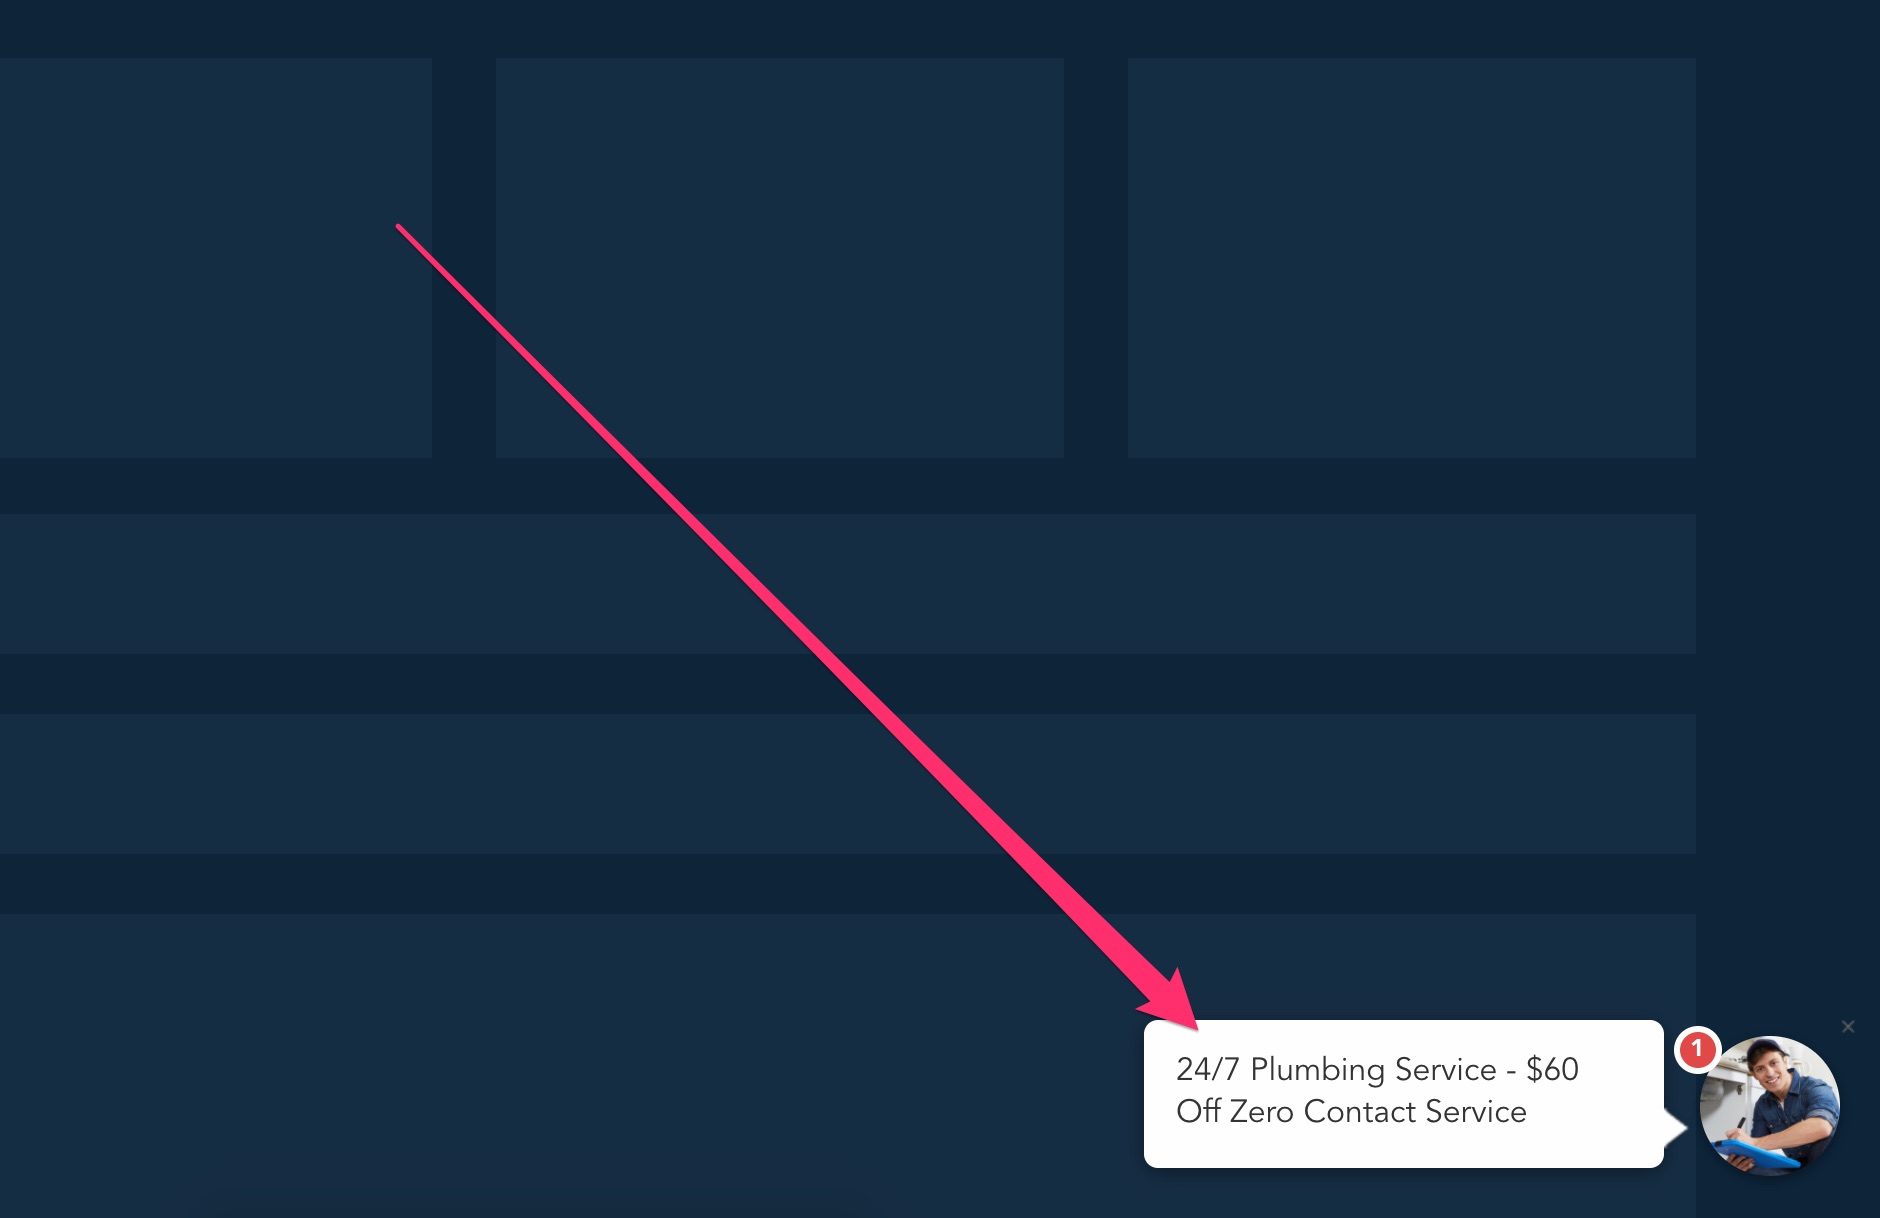
Let’s say that someone Google’s Plumbing Repair Service and they click on the ad below:
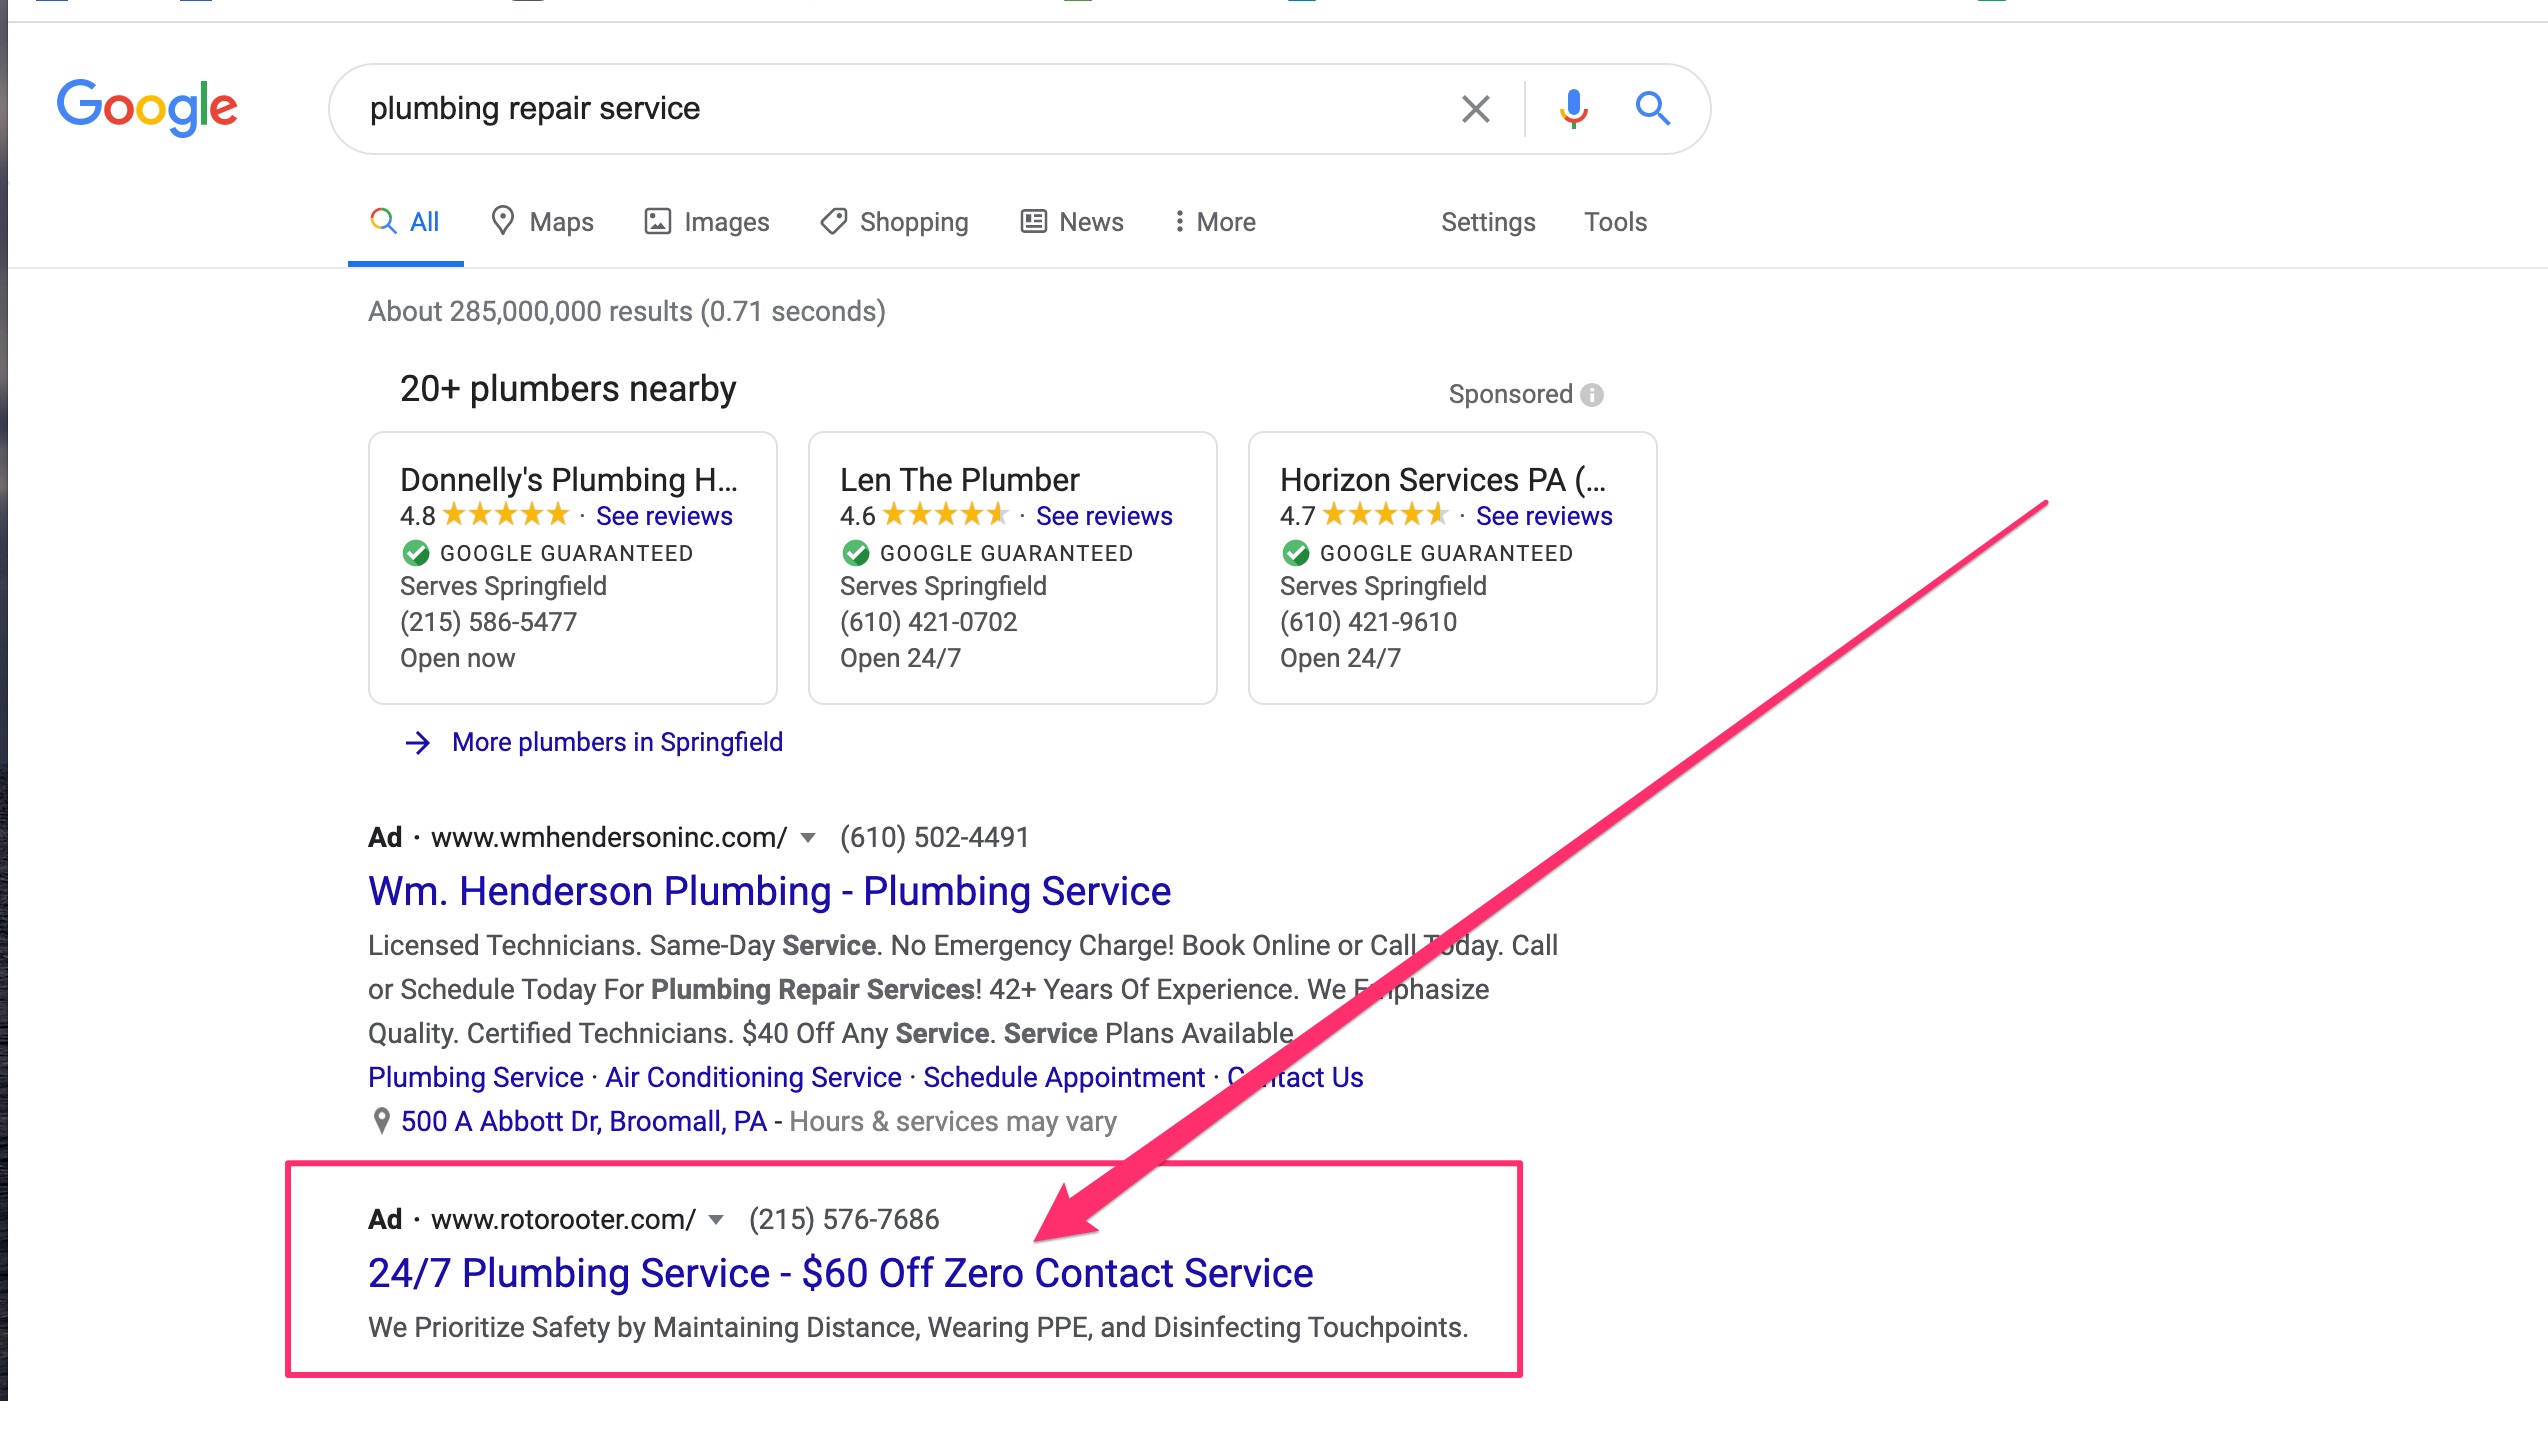
If the PPC team wants to match the headline of the form to the headline of the ad, then they can do so by inserting this variable into the headline area of the form: {url__headline}

So if the URL is something like: https://domain.com/?headline=24/7%20Plumbing%20Service%20-%20$60%20Off%20Zero%20Contact%20Service
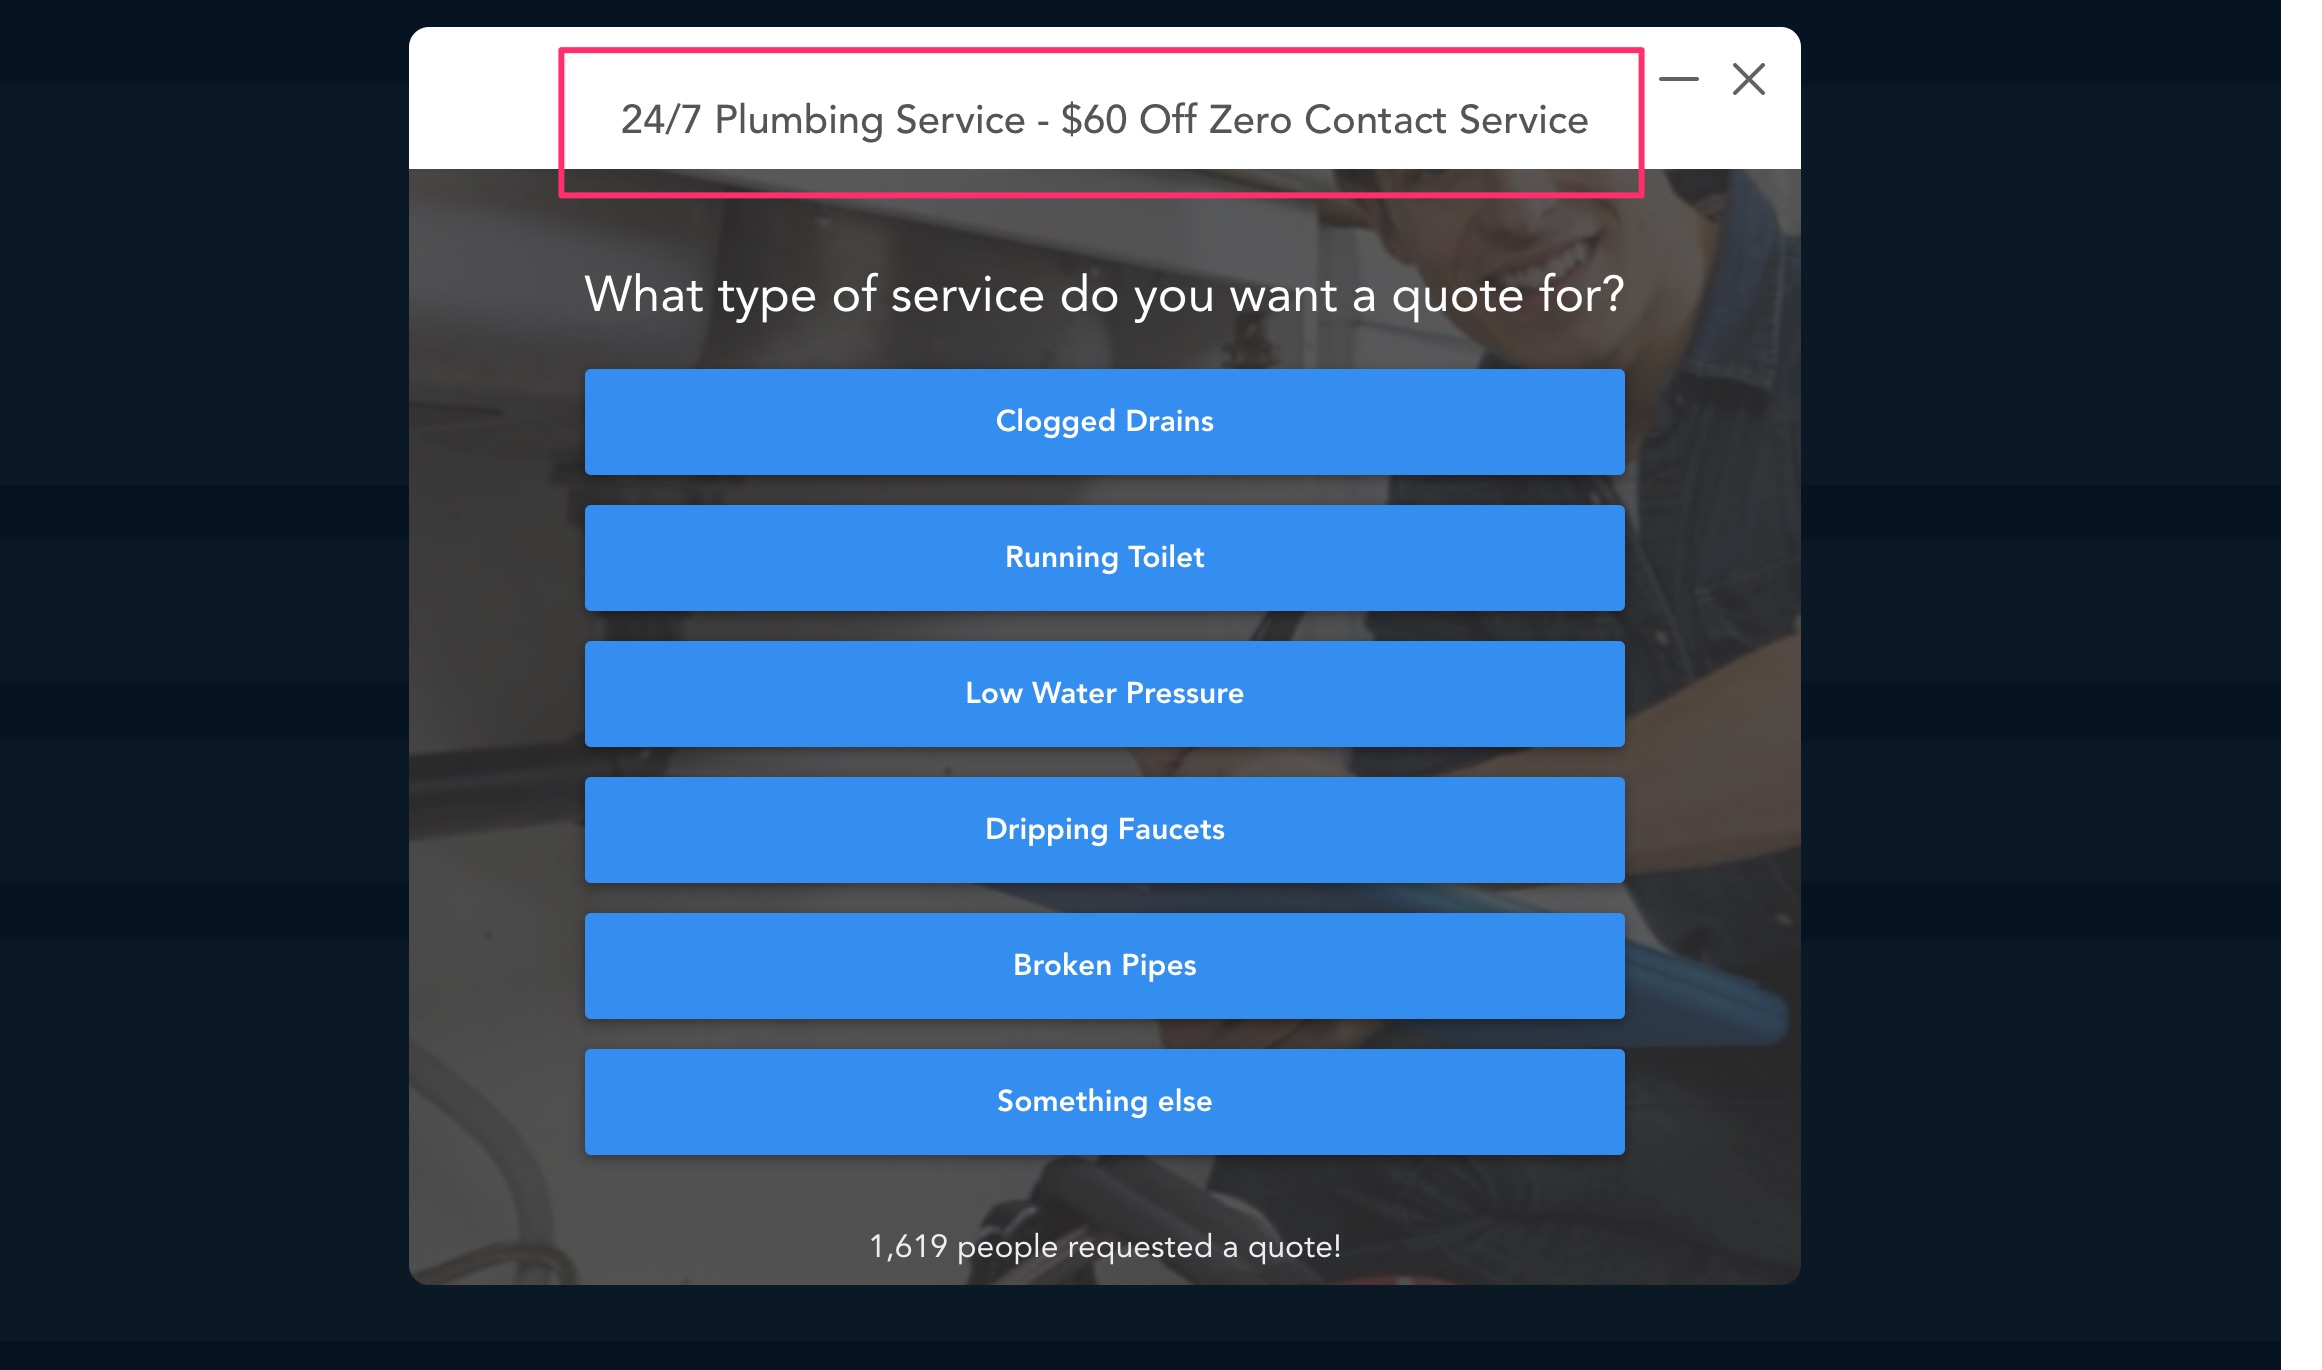
Then using the variable {url__headline} will dynamically adjust the headline of the LeadForm so it looks like this:
This feature opens up a whole new world of opportunities when it comes to matching your ad’s message to your form.
2) Personalizing the on-site messages with the headline of the ad
In addition to matching your form’s headline to the headline of your ad, you can also carry the headline into your on-site message to help boost engagement.
Let’s go back to the previous example:

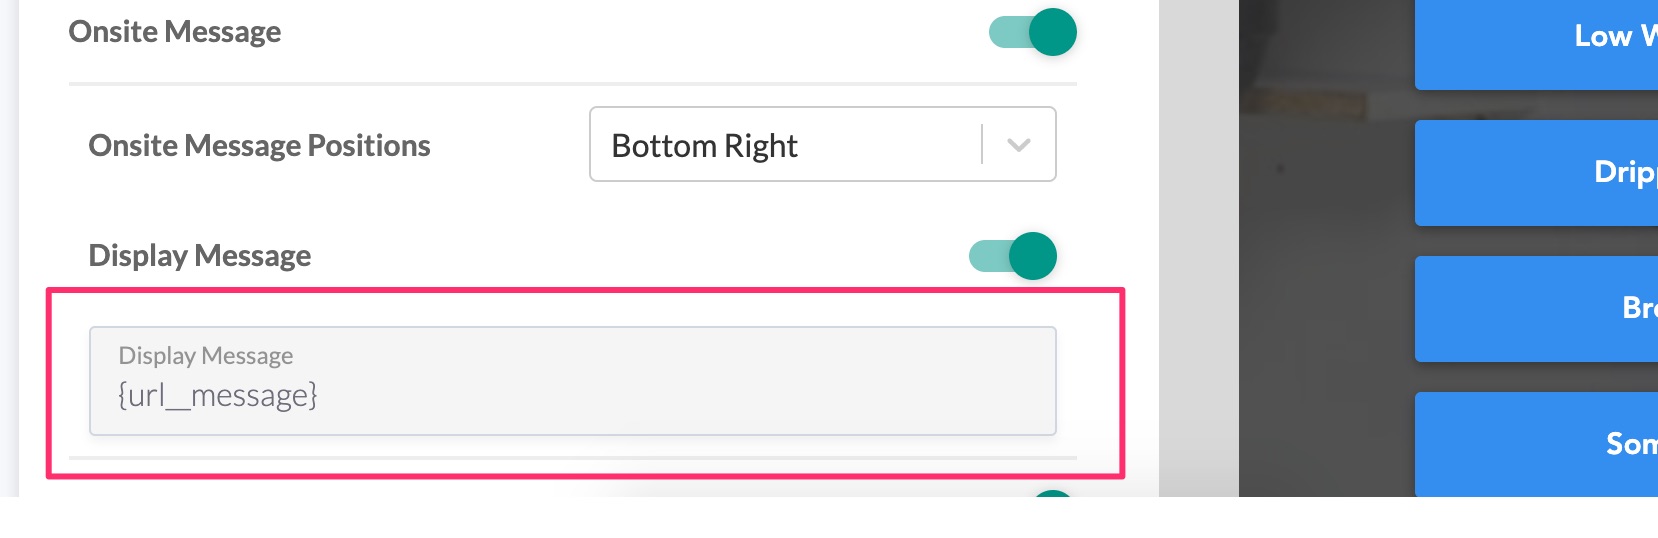
You can carry the same headline into the onsite message as well by structuring the URL like this:
https://domain.com/?message=24/7%20Plumbing%20Service%20-%20$60%20Off%20Zero%20Contact%20Service
Simply insert this variable {url__message} into the form like this:
Then the LeadForms is smart enough to pull in the URL Parameters to match the Google Ad Headline. So, the onsite message looks something like this:
The message will adjust for any ad that uses the parameter “headline” or whatever else you end up using.
3) Dynamically Matching Locations
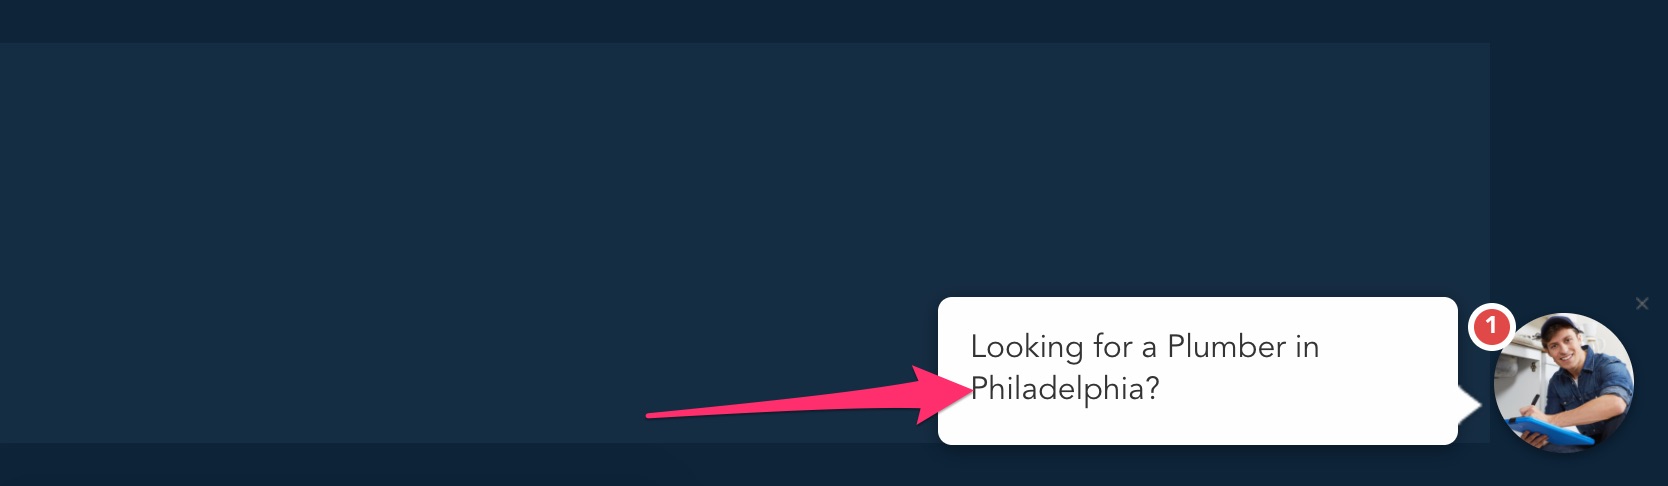
You’re not restricted to just matching the headline of the ad. If you’re running ads for a local service business, then you may want to pull in the business location into the onsite message like this.
Let’s say that the service is targeting a few big cities nationwide, one being Philadelphia.
Setup the domain like this:
https://domain.com/?location=Philadelphia
And add the variable: {url__location}

The onsite message will include the city, Philadelphia:
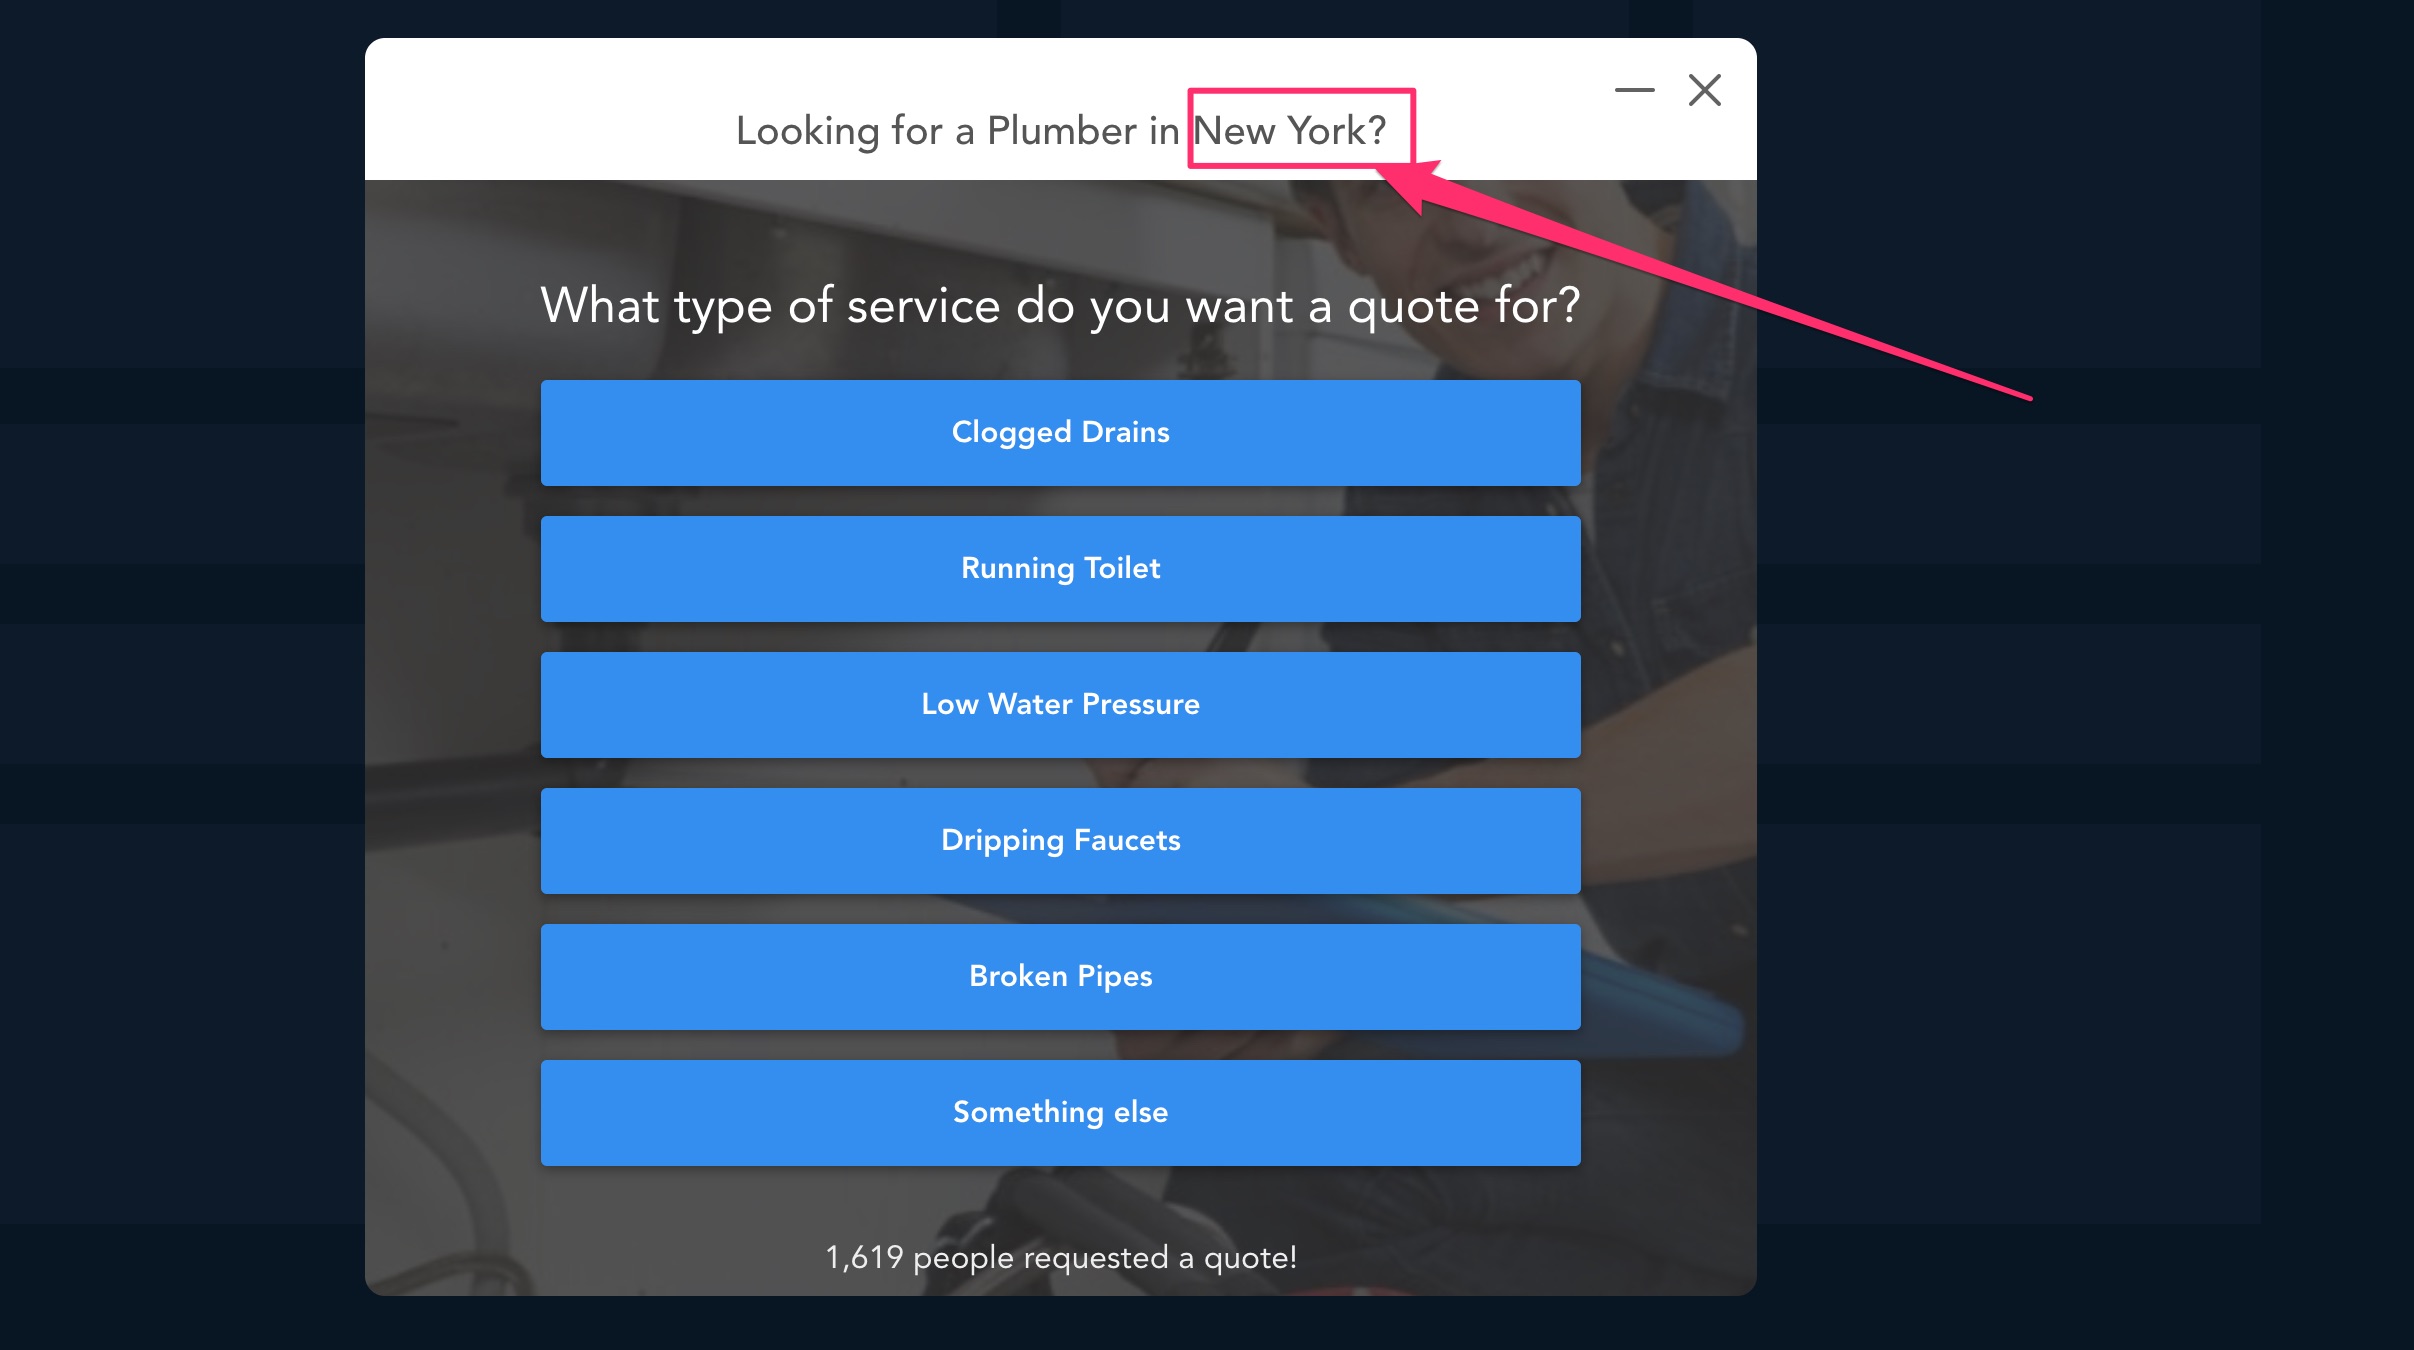
If the city changes to New York, then the onsite message will also change:
https://domain.com/?location=New%20York

Using this feature guarantees that you’ll boost form engagement.
More engagement means, more leads.
You can even use the location in the header of the form, like this:
Simply change the headline to: Looking for a Plumber in {url__location}?

The form will pull in the headline location from the URL, let’s say it’s still: https://domain.com/?location=New%20York
And finally, there’s really no limit to what you can do. You can add any URL Parameter that you want, pretty much anywhere on the form that you want.
Even the social proof area:

How to Get Started With Personalization
You don’t need to personalize every step like I did in the example above. I just wanted to show you how it all works together. Simply personalizing one or two steps, especially the submit button, will go a long way in helping you boost leads.
I’m really excited to see how you implement our Personalization feature into your LeadForms.
Here are some helpful links:
- Setup Guide: Read the documentation here
- Example: Chat style form personalized with first name only.
- Example: Pest control form fully personalized.
- Starter Templates: Log into your account to access starter templates that are already setup with the Personalization Feature